


As you get set to cook that Thanksgiving bird, you’re likely to come across a bunch of terms that mom and grandma never mentioned.
Spatchcocked, brining, dry-brining, trussed, etc. All of this shows up and you wonder where to begin.
The internet (and social media) is full of advice on how to turn the Thanksgiving dinner centerpiece into the finest cooked piece of poultry on the planet. Some of it works really well. Here are a few things we found that might keep you from drying out, overcooking, undercooking, or just plain ruining your turkey.
Spatchcocking
Besides being a fun word, spatchcocking is a chef-y way of flattening poultry in order to cook it more evenly. Yes, all of the Normal Rockwell-like turkey you see in magazines, on TV, on the internet, are a golden brown, plumped up incredible sight. But most of the time, what's on the outside doesn't match what is inside. It starts with dried out white meat.
Here’s the problem with turkey or chicken cooked traditionally (as a whole roast). The breast is dry by the time the thighs and legs are done. That’s because the very lean white meat in the breast is done at about 155 degrees (F) while the darker meat in the legs isn’t done until it gets to about 165 (F). How do you cook those to finish at the same time when you roast it whole?
You don’t. It’s almost impossible. Which is why you see so many recipes calling for butter to be slid under the skin of the breast, or wrapping them in bacon. Whatever you can do to add moisture to what is typically a dried out piece of meat by the time it hits your table.
You simply remove the backbone and flatten out the turkey in order to do this. So how does spatchcocking the bird help it cook evenly?
When you flatten the turkey, the light meat and the dark meat reach their optimal cooked temperatures at the same time because the legs and thighs are out to the side, while the breasts are more protected in the middle. They see less heat and reach their temps after the thighs and legs reach theirs.
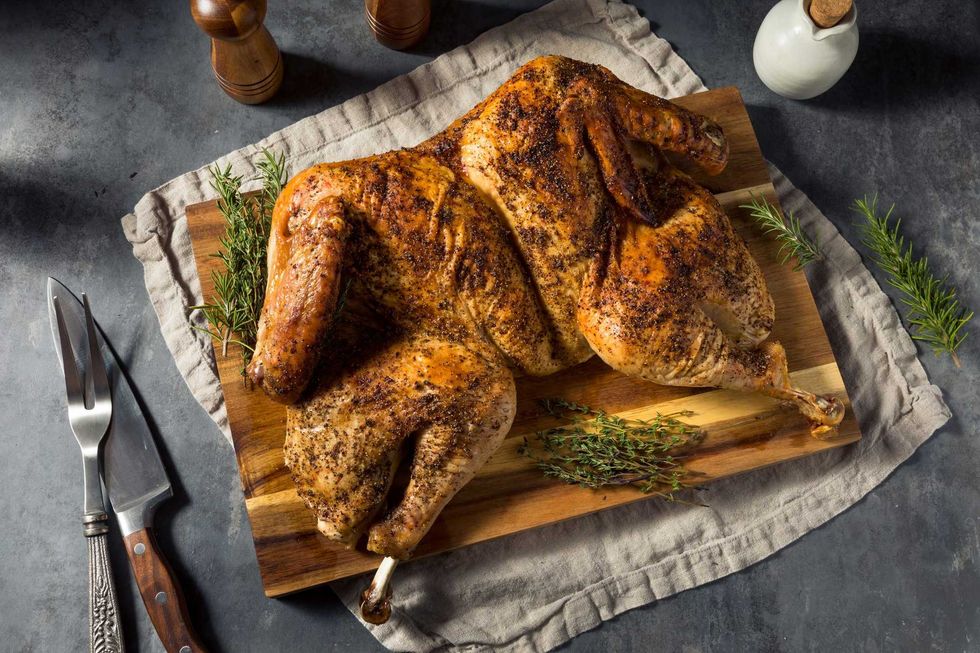 A fully-cooked spatchcocked turkery(Getty Images / bhofack2)
Also, since the skin of a spatchcocked bird is all on top, it all crisps up better so you get that crispy skin all over the top.
As a bonus, the removed backbone can be used to give your gravy another boost of turkey flavor (see below).
How it’s done is one thing. Actually doing it on a giant 20-pound turkey is another. You’re going to need a couple of tools and some elbow grease.
Turn the bird over on its breast. You’ll find the backbone without a problem. If you run your finger down both sides of it, you’ll feel a seam where it is connected to the ribs. That’s what you have to cut through.
If you have a poultry shears or a good kitchen shears, you’ll get most of it. Just start at the neck and very carefully snip your way through as much as you can on each side. You may run into some tougher spots. Here you can use a cleaver to help you out. I actually used a tin snips I had in the garage to get through it.
After you have the backbone out, you can clean up some of the extra fatty bits and parts you know you won’t want. Save them for a broth or just toss them.
Flip the bird over and spread out the legs and wings so it’s semi-flattened. Now you’ll want to get as much on top of the breast as you can and push hard with the palms of your hands. You’ll push down until you hear the breastbone crack and give way. Once you do that, you’ll see the turkey can be flatted out.
From there, you can lay it on a rack on a baking sheet, and get ready for the brine.
Brining
This one is a no-brainer. Anything you cook for a long period of time, especially something that is a lean protein (think turkey, chicken, and white-meat pork) can benefit from a brine.
What is a brine? It’s salt. And that’s about it. Science takes it from there.
Certain muscle proteins are naturally dissolved by the salt in the brine. Once these proteins are dissolved, those muscles lose the ability to contract when cooking. Contraction squeezes out moisture which typically dries out the meat. If the muscle can’t contract as much, that means juicier meat.
Brining also adds seasoning more deeply than just salting like you normally would before cooking.
To brine a turkey using the standard (liquid) method, you’ll have to start by clearing out a space in the fridge big enough to fit a very large container. You could also use a big cooler as long as you can keep it refrigerator cold.
There is a certain ratio of water to salt you’ll need to hit in order to activate the “science” part of this.
For a traditional turkey that is 13-17 pounds, you’ll want 2 ½ gallons of water to 3 ¼ cups of Kosher salt (do NOT use table salt or sea salt as those have a different level of salinity).
Add the salt, and stir until dissolved. Submerge your fully defrosted turkey in the brine solution, and refrigerate for 12 to 18 hours. After brining, remove the turkey, dry with paper towels, and roast it as you normally would. Do not salt it again, but add any other seasonings you want.
Dry-Brining
You can also do this without liquid, and in some ways this is preferable.
Brining turkey in a liquid tends to water down the flavor of turkey. You’ll certainly plump it up with liquid, but that liquid is just water.
A dry brine creates the same effect, but does it without over-watering the bird. In addition to salt, you should add a little baking soda which will help dry out the skin for that crackling, crusty turkey skin.
Much better than the flabby skin that you have to just throw away.
Depending on the size of your turkey, mix six tablespoons of Morton’s Kosher salt with two tablespoons of baking soda. Sprinkle it liberally all over the turkey (inside and out). Don’t overdo it like you would rub a rack of ribs, as an example. But get the turkey covered well.
Transfer the turkey to a rack on a baking sheet, clear out some fridge space and let the turkey sit uncovered overnight. You can even go longer than 24 hours which can help deepen the flavor. If you do that, cover the bird loosely with plastic wrap.
When you’re ready to cook the turkey, roast it as you normally would. As with liquid brines, make sure you don’t salt the turkey again. Just add other seasoning.
Make a Proper Gravy
Gravy is the best. Good gravy is life-altering. And gravy is not difficult despite the reputation it might have in your house. First of all, don’t buy gravy. You can do so much better with a little prep.
Did you remove the backbone? Perfect. Use that. And use the neck that you take out of your turkey and immediately throw away. That is flavor. While you’re prepping your bird, or even better, a couple of days prior, use those to make a stock. You can also use the giblets too (chop them up and cook them in some butter, add them to the gravy). Put the neck and backbone into a slow cooker or a big pot with some onion, carrot, celery, peppercorns and any herbs you like. Cook them in some homemade or store-bought chicken (or vegetable) stock. The longer you cook them the better (I cook mine for 12-14 hours in a slow cooker).
Melt butter over medium-high heat in a saucepan. Add flour (you can use gluten-free flour too) and cook, stirring constantly until flour is golden brown, about 3 minutes. Whisking constantly, add broth in a thin, steady stream until it is all incorporated. Bring to a boil, reduce to a simmer, and cook until reduced to about 1 quart, about 20 minutes longer. Season to taste with salt and pepper, cover, and keep gravy warm.
When the turkey is cooked, you can carefully pour any collected juices from out of the roasting pan through a fine-mesh strainer into a measuring cup. Skim off any excess fat and then whisk juices into gravy for a final touch of flavor.
Also, don't waste parts of the turkey you won't eat after it is cooked. The tips of the wings and area around the neck that are mostly cartilage and fatty bits are perfect for tossing into the pan with the broth and fortifying it even more. Use all of it.
Other Tips and Tricks
Here are a few other things you’ll want to make sure you do, and a few things you shouldn’t.
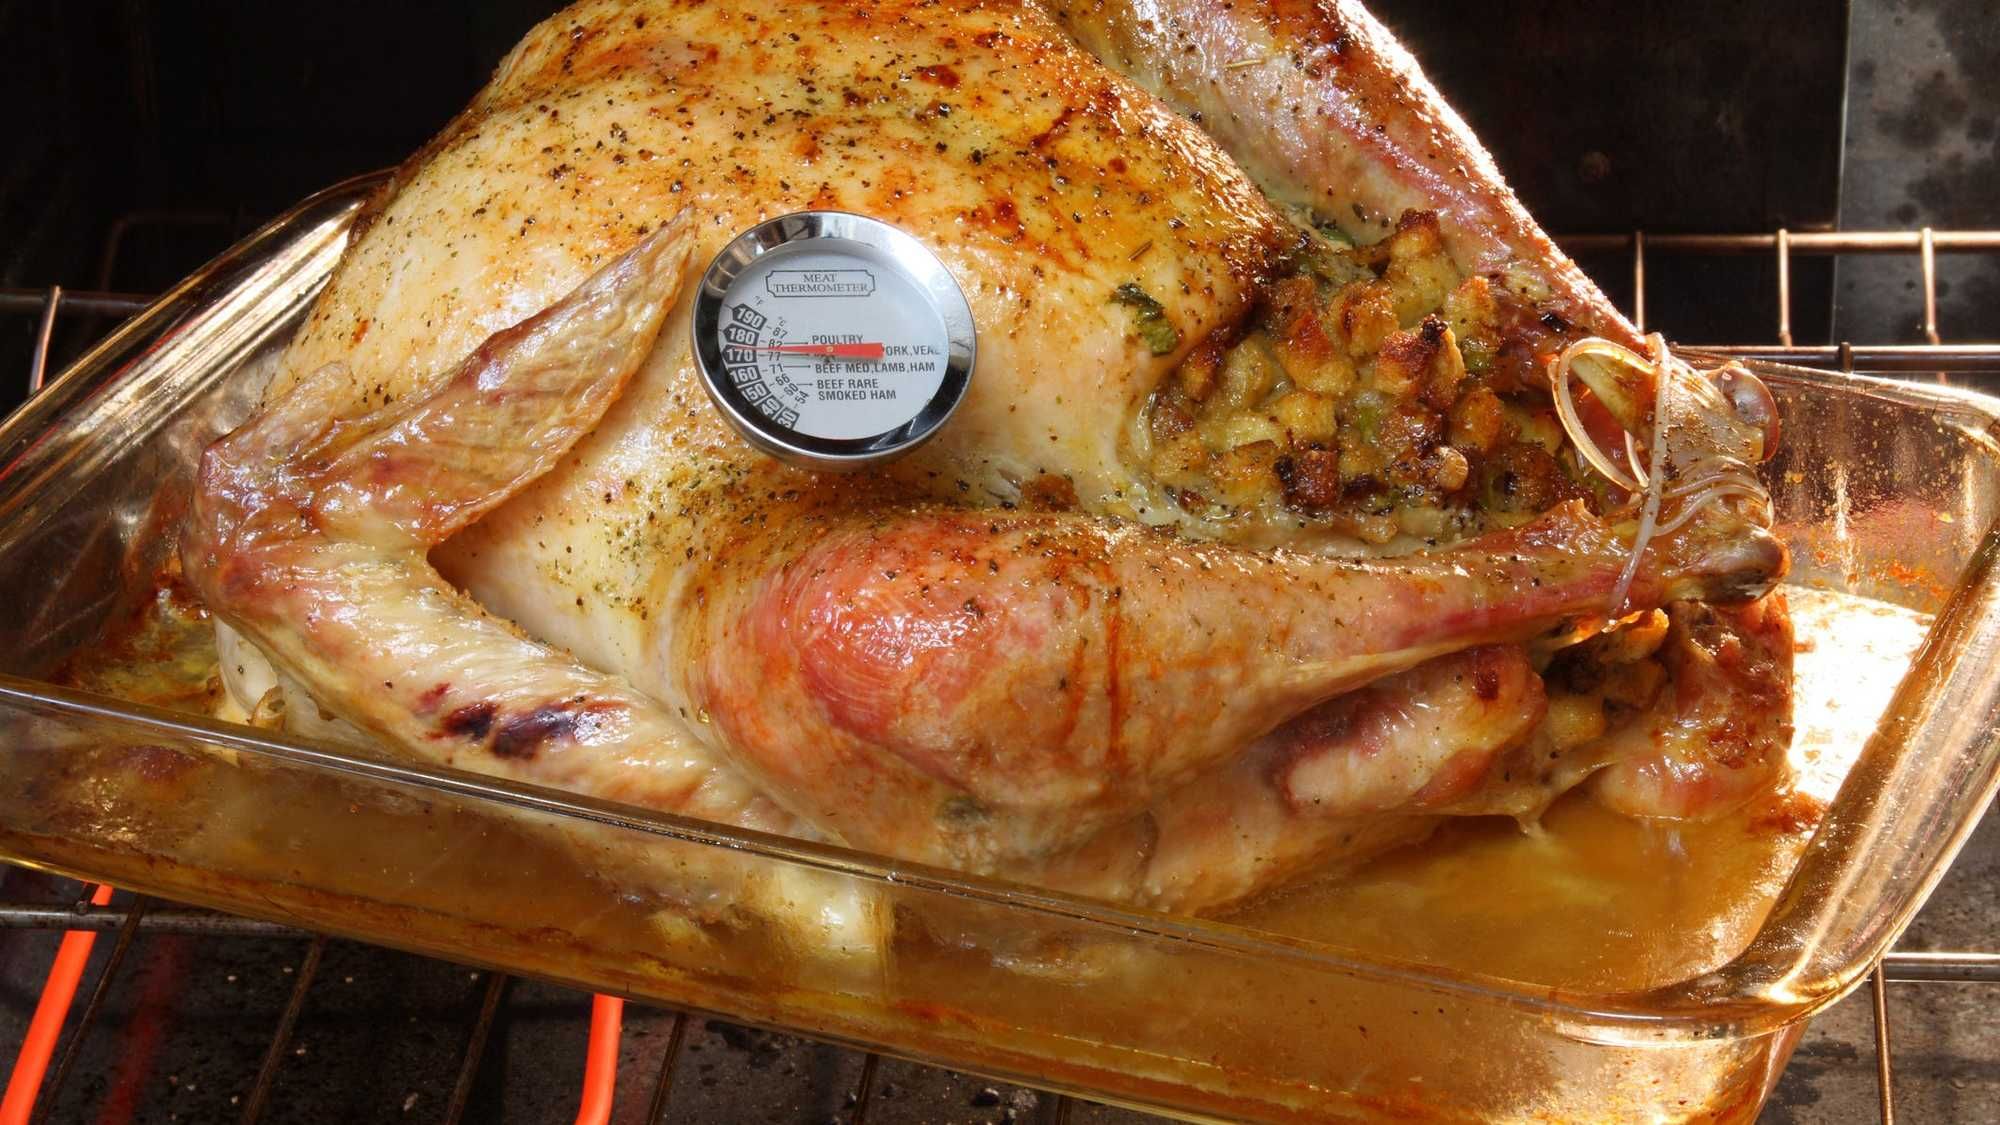
Use a Thermometer- Don’t guess at this part. Get a good, digital instant thermometer. The last thing you want is a turkey that is dried out, or worse undercooked. A table full of guests waiting for you to get it cooked properly can be solved by knowing exactly what temp it is. You should check the temp between the thigh and the breast being careful not to touch the bones. 165 degrees in the thigh is what you’re looking to hit. Forget timing charts (there are too many variables), poking the meat, juices running clear, etc. Take its temp!
Rest the turkey after cooking- Another huge mistake you can make is removing the turkey from the oven, and immediately cutting into it.
Have you seen a cutting board that runs with so much moisture that it starts running all over the counter and the floor? That is the “juicy” meat running away from your plate. There is no reason not to rest for a minimum of 20-30 minutes. You could even go much longer. There are professional chefs that suggest resting meat as long as it takes to cook it. You don’t have to go quite that far, but you want juicy meat. It will take a very long time to actually get cold. So let it rest.
To baste or not baste- You can. It doesn’t really hurt. But it won’t necessarily add moisture. Like when you baste a steak in a pan, all it does is help the meat cook a little faster. If you’re behind schedule, grab the baster. If not, skip it.
Should you butter or oil the turkey- Another one you can skip. It can add some flavor to the skin. But that’s all it does. In fact, you could reduce the crispiness of the skin. Butter has more water in it than you think, and that water can create sogginess.
What about putting stuffing in the turkey- Skip it. Again, it’s all for show. Chances are it is dried out long before the turkey is done. Alton Brown (Food Network’s resident chef that leans on science) says it’s impossible to roast a turkey properly when it is stuffed. In fact, he calls it evil in his book. Good enough for us. Instead, make that unbelievable turkey stock using the bits and pieces you normally throw away and use that to make perfect stuffing on the side. Much better.
Do you really need a whole turkey- Not always? Just a few people coming over? Think about roasting a turkey breast (don’t forget the brine!), or perhaps smoke a couple of turkey legs.
Carving the turkey- It’s a pain. None of us are Gordon Ramsey and we usually end up hacking it up. And guess what? If it’s delicious, nobody cares. But if you really want to get it right, here’s an easy tutorial.
What about all the leftovers- Here are a ton of ideas. You had us at Stuffing Waffles.